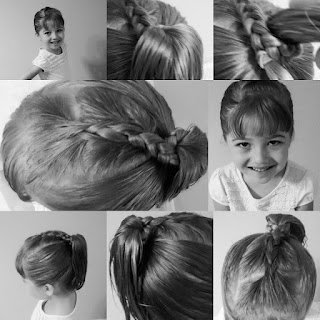
We started by taking her hair and dividing it about the middle of her eyes. We combed down the sides and combed the section in the middle back. I then took the middle section and took a section in the front that was large enough to start a braid with. I braided her hair 3-4 times and then added more hair from the middle section. I did this until we were at the back end of the crown of her head. This is where I stopped adding hair. I continued to braid the hair all the way to the end.
A few weeks ago my daughter had, what she called, her first big girl birthday party. I think she called it this because she is starting school soon and she got to pick out her friends present at the store. She wanted to look her best and kept asking me to do different hair styles for her to see what she wanted to wear to the party.
We started with a more party type hairstyle that seemed to be very punk. Thus the name the Punky Pony. This was fairly easy to do. For her hair it is easiest to braid while wet since she has hair that is half curly and half straight. If it is weight we can put some leave in conditioner and avoid any knots.

I took the braid and wrapped it around the ponytail holder. Thus hiding the pony tail holder and giving the pony itself a little boost upward. I secured it by slipping the braid under itself and the rubber band for the pony tail.
You can stop hear unless you notice that the braid is pulling up away from the ponytail holder. My daughter's hair is layered and shorter so their wasn't a lot of braid to wrap with. We took two bobby pins and secured the braid down around the ponytail holder. Then we pinned the hair of the pony to the head to help hid the braid rubber band and make the pony tail look fuller.
In the end this is what we got! Here is the veiw from the top!
Here is what the side of the hair looks like. You can spray again if you want to make sure the hair stays in place.
That is is for our Punky Pony! It is fairly easy and looks super-cute! Perfect for an active party or just an active kid!


No comments:
Post a Comment